Written and tested by the MD Converter editorial team
Markdown Document Converter User Guide: Features and Steps
Full Markdown Document Converter guide: import options, every toolbar control, presets, page-break and image adjustments, cover and TOC pages, HTML download, and PDF export.
About this article
This guide explains the screen layout of Markdown Document Converter and how to convert Markdown to HTML or PDF, control by control. If you only need the shortest path, start with the Markdown Document Converter Quick Start in 4 Steps.
1. Overview of the tool
The top navigation has Home / Tool / How-to & Blog; pick a conversion from Tool. This guide covers the two most common document tools:
| Tool | Use it for | Main controls |
|---|---|---|
| Markdown to PDF | PDFs for printing, sharing, or submission | Presets, margins, page numbers, background color, page breaks, cover, TOC, images |
| Markdown to HTML | A single HTML file for the web or a portal | Image and diagram size and alignment |
Both follow three stages: Import → Review & adjust → Save. Local files and pasted Markdown are converted and previewed in your browser; the source is not uploaded to this site's servers for conversion.
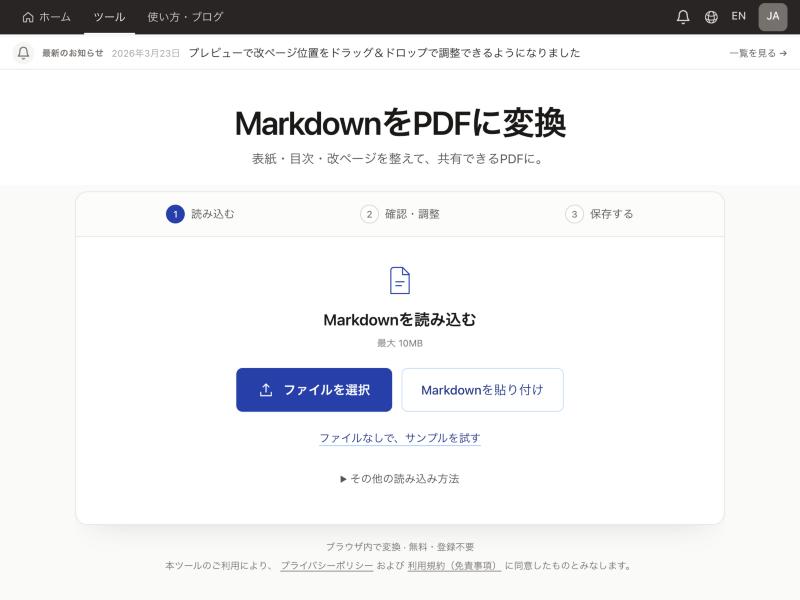
Figure: The screen before importing. The three stages are shown across the top. (Screenshot of the Japanese interface.)
2. Importing Markdown
On the start screen, choose one of these options:
| Option | How | Limits |
|---|---|---|
| Choose file | Pick a .md file, or drag and drop it onto the page | Up to 10 MB |
| Paste Markdown | Paste into the dialog and click Import | Up to 2 MB |
| Try a sample | Click "No file? Try a sample" | — |
| Import from GitHub URL (PDF) | Enter the URL of a .md file in a public repository (regular or raw URL) | Public files only, up to 2 MB |
| Markdown + image folder (PDF) | Choose a folder with the .md and its images; relative image paths resolve | Up to 20 MB total |
| Markdown + image ZIP (PDF) | Choose a ZIP that keeps the folder structure | Up to 20 MB total |
GitHub, folder, and ZIP appear under "More ways to import". After a document is loaded, the toolbar's Import menu offers the same options. If a document is already open, you are asked to confirm before it is replaced.
Note: Imported Markdown is read-only in the tool. To change the text, edit the .md file in your own editor and import it again.
3. Screen layout and toolbar
After import you see the toolbar, the page strip, the preview, and the save bar.
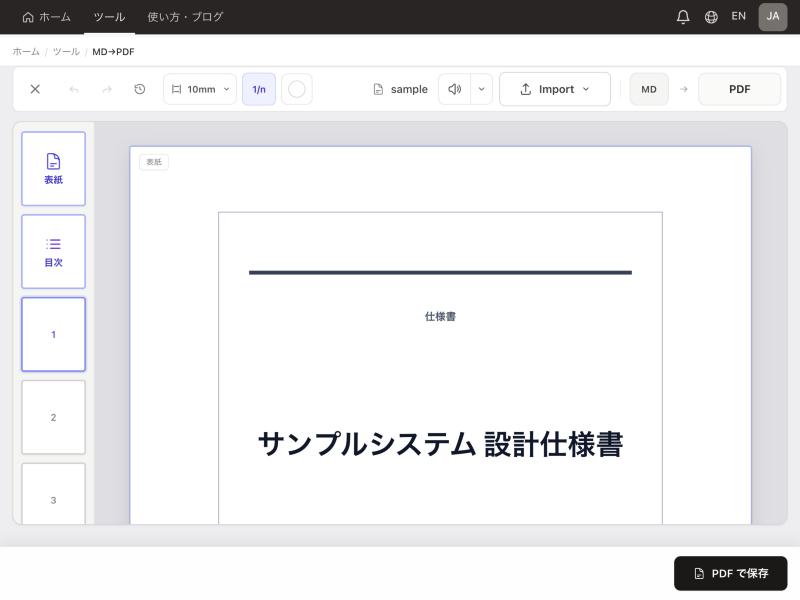
Figure: The PDF tool after import. Use the page strip to jump to the cover, TOC, or any page. (Screenshot of the Japanese interface.)
The main toolbar controls in the PDF tool are:
| Control | What it does |
|---|---|
| × (Reset) | Returns the body, filename, cover, TOC, layout, and edit history to the initial state (with confirmation) |
| Undo / Redo | Steps back or forward through page-break and image adjustments (⌘Z / Ctrl+Z, etc.) |
| History (clock icon) | Lists layout edits and jumps back to any point |
| Margin | Choose 10 mm to 30 mm, applied to all four sides |
| 1/n | Shows or hides page numbers |
| Round swatch | Page and preview background color |
| Speaker | Reads the document aloud (set speed and voice in the menu beside it) |
| Import | Re-import from a file, paste, GitHub, folder, or ZIP |
The HTML tool shows Reset, Read aloud, and Import.
4. Start from a preset (PDF)
Before import, the PDF tool shows "Choose a layout by purpose" with Specification, Proposal, Meeting notes, Report, Technical doc, and Minimal presets. A preset sets the cover template, TOC, margins, page numbers, background color, font size, and line height together.
After choosing a preset, click "Create a PDF from Markdown with this preset" to pick a .md file, or drop the file onto the area above. You can still change margins or the cover after import.
5. Adjusting in Preview
The PDF preview is split into A4 portrait pages. Content that does not fit on one page is outlined in orange and continues on the next page in the PDF.
Page breaks
- Insert or remove — click a block (paragraph, heading, table, and so on) to toggle a break before it
- Move — drag the ⋮⋮ handle on a break line to another block boundary
- Delete — the × on a break line also removes it
Tables and code blocks are set by default to avoid splitting across pages where possible. For details, see Markdown Document Converter Page Breaks.
Images and diagrams
Select an image or Mermaid diagram to resize it from its corner handles and align it left, center, or right. In the PDF tool, a button also toggles a page break before the image.
Drop PNG, JPEG, GIF, or WebP files onto the preview to insert them near the drop position. Limits are 5 MB per image and 20 MB in total.
6. Cover and table of contents (PDF)
Click "Cover" in the page strip to open the cover panel beside the preview. There you choose a template, enter the title and date, get wording suggestions from the body, and arrange text, shapes, and images. See the Markdown Document Converter Cover Editor guide for details.
Click "TOC" to open the TOC panel, where "Add a table of contents page" builds a contents page from your headings. The TOC is available when a cover is on and the body has headings. Both the cover and TOC appear in the preview as pages before the body.
7. Downloading HTML
In the HTML tool, click "Download HTML" at the bottom to save one HTML file that matches the preview.
- Styles are inlined, so that one file preserves the layout.
- Imported images are embedded in the file. Images referenced by external URL are fetched from their hosts each time the file is opened.
8. Saving as PDF
In the PDF tool, click "Save as PDF" at the bottom to open the browser's print dialog. Choose "Save as PDF" as the destination and pick a location.
- The tool lays out pages as A4 portrait. Select A4 in the print dialog too.
- Margins are already set in the tool, so start with the dialog margin set to None.
- Turn headers and footers off and keep scale at 100%. If background or template colors disappear, enable "Background graphics".
- The suggested filename comes from the cover title, the first H1, or the original filename. Check it before saving.
When the print dialog closes, the tool shows a short notice. For consistent PDF output, Google Chrome is recommended. For the full workflow, including paper size, margins, and page breaks, see How to Print Markdown or Save It as PDF.
9. FAQ and notes
- Are my files sent to a server?
Local files and pasted Markdown are converted in your browser; their content is not uploaded to this site's servers for processing. Importing from a GitHub URL contacts GitHub, and remote images or web fonts contact their hosts. - Can I edit the text in the tool?
No. The preview is read-only; you adjust layout, not content. Edit the original .md and import it again. - Will my data be lost if I reload?
A reload keeps the imported document and settings in the browser. Navigating from the tool to another page, or opening the tool fresh, resets them. - Can I change paper size or orientation?
The PDF tool lays out pages as A4 portrait. - What about slides?
Use the Markdown to slides tool under Tool in the navigation. See How to Convert Markdown to Slide PDF with Marp.
For questions or feedback, use the Contact page.