Written and tested by the MD Converter editorial team
Markdown Document Converter Cover Editor: Text, Shapes, and Logos
Use the Markdown Document Converter cover panel to pick a template, get wording suggestions from your document, customize text, shapes, colors, and logos, then run practical preflight checks.
Add a cover without changing the Markdown body
The Markdown to PDF tool keeps cover design separate from the Markdown source. Open the cover panel, choose a template, fill in the document details, and export.
The basic sequence is:
- Import the Markdown body.
- Click "Cover" in the page strip on the left to open the cover panel.
- Confirm that "Add a cover page" at the top of the panel is on.
- Choose a template under Template.
- Enter the title, date, organization, and other details under Content.
- Adjust text, shapes, and images only after the information is final.
- Check the cover page in the preview and save the PDF.
The cover appears in the preview as a page before the body. Still check the first page of the saved PDF.
Understand the cover panel
The cover panel opens beside the preview, and you edit the cover directly in the preview on the right.
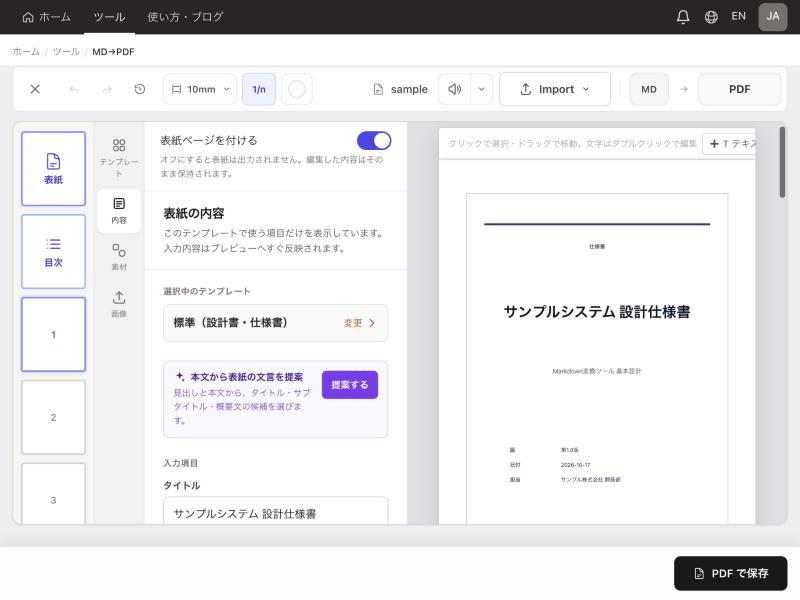
Figure: The cover panel. Enter content in the middle, then select and move objects in the cover preview. (Screenshot of the Japanese interface.)
| Area | What it does |
|---|---|
| Top of the panel | Turns "Add a cover page" on or off |
| Left tabs | Switch between Template, Content, Elements, and Upload |
| Cover preview on the right | Select, move, resize, edit text in place, and add text |
| Toolbar for the selection | Format text, shapes, lines, and images; duplicate; delete |
A reliable workflow is to choose the template first, finalize the document information second, and add decorative elements last. This avoids rebuilding the layout when a title or organization name becomes longer.
The cover uses an A4 single-page ratio and exports as A4 even if it looks small on screen. Check the margins and balance of the whole page, not just the details.
Choose a template
Under Template, compare thumbnails and pick a cover. Groups include Japanese standards, basic records, business, school and academic, promo, creative and editorial, technical and formal, and custom. The set can change as the product evolves, so use the current list rather than a fixed count.
Start with Standard (design/spec document) or Japanese minimal for a neutral layout. Choose according to what readers must identify first: recipient and publisher for a proposal, author and affiliation for research, or version and date for a specification.
Enter document details first
The Content panel shows only the fields the selected template uses, and changes appear in the preview immediately.
Under "Suggest cover text from your document", click Suggest to get candidate titles, subtitles, and summary lines from your headings and text. Apply them one by one or with Apply all, then refine the wording, since suggestions are a starting draft.
Finalize the information before arranging objects. If a title is long, move secondary wording into a subtitle or widen the title box rather than shrinking the text too far.
Edit the canvas
Select an object and drag it to move it. Side handles change width, top and bottom handles change height, and corner handles scale while keeping the aspect ratio; for text, corner handles also scale the font size. Guides appear at the page center and near other objects to help alignment.
Double-click text to edit it in place. Press Enter or click outside to commit, and press Escape to cancel. For text objects, the toolbar controls font, point size, bold, italic, alignment, and color. Grouped label/value objects let you set label and value colors separately and edit each row.
The Elements panel adds heading, subheading, and body text, plus rectangles, rounded rectangles, ellipses, lines, and thick bars. Shapes support fill, border, border width, radius, and opacity. Lines support color and thickness.
Duplicate is useful when several labels need identical styling. Delete or Backspace removes selected objects. The editor also supports Ctrl/Cmd+C and V, Ctrl/Cmd+A, Ctrl/Cmd+Z, and redo with Ctrl+Y or Cmd+Shift+Z. These clipboard operations apply to cover objects.
Keep decoration subordinate to the title and publisher information. One accent color, consistent alignment, and generous whitespace usually produce a stronger business cover than many competing elements.
Add a logo or photo
Upload a PNG, JPG, WebP, or GIF up to 3 MB. Choose Fit to show a full logo without cropping, or Fill when a photo should cover its frame. Selected images can be rounded, made partially transparent, or replaced while keeping their position and size.
Check that small lettering remains legible at 100% PDF zoom and that the image contrasts with its background. Low-resolution photos look blurry in the PDF, so use an image large enough for its displayed size.
Color and practical composition
Change the overall accent under Content → Accent color, or return to the template's color with Default color. When a shape's Accent option is set to Fill or Border, it follows the cover accent, so one color change updates the related decoration.
Start with a white or very light background, dark text, and one accent color. Do not rely on color alone to communicate meaning; headings and labels should remain clear in grayscale.
Example: business proposal
Start with Proposal or Corporate. Replace the title first, then enter the submission date, version, and owner. Apply the organization's accent color and add a logo with Fit so it is not cropped. Keep the logo away from the title's reading area. Then turn on the TOC page and confirm the order is cover, TOC, then body.
Example: technical specification
Start with Standard (design/spec document), Specification sheet, or Technical. Prioritize the system name, document type, revision, update date, and responsible team. Build the TOC from ## and ### headings and check the breaks before each chapter. The suggested PDF filename uses the cover title and, when available, the date and version.
Custom (free layout)
The Custom template starts from a blank page where you freely arrange text, shapes, and images. Text that uses shared fields can still be filled in from the Content panel. Try a built-in template first; Custom is most useful for fixed wording or a specialized structure that must be repeated exactly.
Important behavior
Switching away from a modified template asks you to confirm that its changes will be reset. Use "Reset to default layout" to restore the selected template's original composition, and note important values before doing so.
Turning off "Add a cover page" exports the body without a cover and keeps your edits, so you can turn it back on later. The TOC page is available only while a cover is on. The toolbar's × (Reset) clears the body and layout as well as the cover, so keep your original Markdown file.
If a title overflows, widen its box first, split secondary wording into a subtitle, and reduce the font only as a final step. If a logo is cropped, switch from Fill to Fit. If cover colors disappear in the PDF, enable "Background graphics" in the print dialog.
Preflight the exported cover
Check the saved PDF rather than relying only on the editor view:
- Title, date, organization, and revision are correct.
- No suggested or sample text remains unintentionally.
- The logo is sharp, uncropped, and has enough clear space.
- Text remains readable against images and in grayscale.
- The cover occupies exactly one page.
- The TOC or first body heading follows in the intended order.
- Paper size (A4), background graphics, and browser headers are correct in the print dialog.
Open the result at 100% zoom. If recipients may print it, also inspect a grayscale preview.